The FABULOUS Miss Ginger Grant!

The FABULOUS Miss Ginger Grant!
Click here to dig through my stuff!

Miss Ginger's FABULOUS Things!

NEW!!! Visit my online store for your chance to buy all things Ginger!

Search Miss Ginger's FABULOUS World!

Custom Search

Translate

Sunday, November 24, 2013

Wintertime QuickCraft®: Fire Starters!

It looks like those GingerSnaps lucky enough to have a wood-burning fireplace will get a lot of use from it this year, if the beginning of winter is any indication of its intensity! Miss Ginger's indoor fireplace is push-button gas, which is convenient and cozy, but it doesn't really satisfy her pyromania like a real wood-burner, so she keeps an outdoor chimenea stoked on the patio for the times she can't resist the firebug! 

Whether your fireplace is indoors or out, and whether you are at home or out camping around an open fire, here is a little craft idea that will make starting a fire (on purpose!) a cinch! Just follow her steps carefully, so you don't start a fire before you want one! If you don't have a fireplace, you could still make these as a thoughtful gift for someone who does! It's a total up cycle, so the cost is virtually nil! 

You'll need some coarse sawdust, a paper egg carton (foam won't work) and some wax. Miss Ginger saves the ends and crumbs of candles throughout the year, and adds them to any "strangely scented" candles she may have acquired. If you don't have enough "candle leavings" you can buy a box of wax in the canning section at your grocery store, but that kind of defeats the purpose of an up cycle, no? 


Melt your wax in a double boiler, or an old, clean can floating in a pot of boiling water.  An old metal coffee pot from a garage sale is a great pot for melting wax because it has a handle and spout to facilitate pouring! 


While your wax is melting, begin packing the sawdust into the individual cells of the egg carton.  Miss G tears the top off and use it as a little tray under the bottom to help catch the overflow, but you want to make sure you protect your work surface with several layers of paper to catch spills and soak-through.


Once the wax is melted, carefully pour it over the sawdust, filling each cell with wax.  It will take a lot, because the paper carton will also soak up a lot of wax! 


When the wax is completely cooled and hardened, break apart the cells to create individual starters.  You can make simple gifts by tying them up in a cello bag with some festive ribbon, or fancy ones by nestling them into a bed of sawdust in a small crate or box.


These cute little fire starters  light quickly and reliably with a match or lighter, and because they are coated in wax, they will work rain or shine! 


Monday, November 11, 2013

Gold Leaf Canisters

These beautiful treasure jars feature real metallic leaf, and are the perfect vessel for corralling beauty supplies in the bathroom, or craft supplies in the studio!  They would also be beautiful with a hand-made or store bought candle, or just filled with seasonal materials for festive decor.  They are a great project to practice the art of gold leaf, and can be made from cut bottles with wooden lids, or discarded glass jars with a screw-on lid.  Here are the steps Miss Ginger used to make this classic fleur-de-lis design:


After cutting her bottles, Boy G made the lids on the lathe, and she gathered the rest of her tools and materials.  "Gold" leaf comes in sheets from the craft store, and while it IS metal leaf, it's no longer all gold! You will also need adhesive, undercoat, and sealer- all available online or at the craft store- and and assortment of brushes, depending upon the complexity of your design.


Miss Ginger made stencils to create the fleur-de-lis pattern on the glass. The stencil will control the placement of the adhesive, so the gold leaf will stick to the glass only where the adhesive is applied.


She prepared the lids by painting them with red basecoat, the traditional undercoat for gold leaf.  She used the brownish-red base coat specifically sold for gold leaf, but she has found you can use just about any paint underneath. 


The options for the adhesive are not so generous- you really need to use "Adhesive Size" specifically made for gold leaf. It is thin and clear, dries with the right amount of tack, and stays sticky until covered with leaf.  It does come in a spray form and a pen form... sort of a "glue marker" that would be great if you have pretty penmanship! Miss Ginger has the handwriting of a serial killer, hence the stencils! 
After placing the stencils, she applied the sizing with a small artist's brush, allowed it to dry a bit, and then removed the stencil, leaving an almost invisible film of adhesive on the surface of the glass in the shape of her fleur de lis design.  You can't see it in the photo, but the adhesive is there on the 2 glasses on the left- I promise! Once the base coat was dry on the lids, she covered them with adhesive, as well.
Now comes the fun part!  Gold leaf comes in a little "book" with a clear plastic cover and tissue interleaves to keep each delicate leaf pristine until you are ready to place it.  Static makes it cling to the clear cover, which allows you to handle the leaf without tearing it.  After you've place a leaf, you can tear away the tissue, close the cover, and the next leaf will cling to plastic. Pretty neat, huh?
Miss Ginger laid the gold leaf across the adhesive on the jar and carefully slipped the plastic sheet away, leaving the leaf in place.  You can see the outline of the FDL in the photo; the gold leaf is adhered smoothly in the places where there was adhesive.  The leaf is loose in the voids of the design. 


With an artist's brush, Miss G smoothed the leaf onto the entire image, to make sure it was adhered everywhere. 

Then, with a stiffer brush and a somewhat more aggressive stroke, she began brushing away the excess leaf, in some cases using the brush a sort of a "spatula" to lift large pieces of leaf away that can be reused on the lids.  

There is very little waste with this process, as the pieces that surrounded the image on the glass could be used to cover the lids.  Part of the charm of real gold leaf is that a bit of the undercoating shows between the pieces of leaf, so this is a perfect place to use the "scraps". 


As the leaf is applied to the lids, it is brushed smooth, and the "crumbs" are brushed away and can be saved for even smaller projects!  After all the leaf was placed, Miss Ginger brushed sealer across the lids, and used a smaller brush to cover just the gold design on the glass. The sealer protects the leaf from abrasion, but if the glass ever needs washing it should be done very carefully by hand.


That's it! Wouldn't they be beautiful filled with woodsy fall potpourri?  Leave a comment and tell Miss G what YOU would put in them! 


Thursday, November 7, 2013

Craftroom QuickTip®!

Miss Ginger always keeps a big roll of butcher paper at the end of her craft table... you can buy one that's about a mile and a half long at the club store or restaurant supply, and it will last for years and years!  And it is SO handy! 


Hers is mounted on a little dispenser made from scrap lumber and piece of metal conduit, but you can also buy one at the restaurant supply.  It gives her an endless supply of clean paper to use for everything from sketching out patterns to scratching out shopping lists. 


And here's the best thing... whenever she's working with something messy like glue or paint, she just gives the roll a tug and pulls a sheet out to cover then entire table!  Then, no worries about spills and stains! Ones she's finished, she cuts it at the roll on throws her spatters and spill in the garbage! 

Monday, November 4, 2013

Basic Skills: Stencils

Stencils are what allow Miss Ginger to be an artist.... trust, honey, this bitch can't draw a straight line, much less a shape that looks like anything other than a blob! Those of you as "advanced in age" as Miss G may remember the manila stencils we used to buy at the dime store whenever we had to make posters  for school.  You held them against the poster board, and traced within them with a pencil or crayon, and it made all of your lettering look like it was cargo from overseas! 


While you can now find plastic stencils at many craft stores, you are limited to the designs that are available, and these stencils still have the basic problem that has plagued reusable stencils since the beginning of time:  "floating" negative space has to be connected with a void, causing that "stencilly" look that says "8th grade poster from the 70's!" 

Every modern craft room today has some sort of "die cutter" to make hearts and flowers out of all sorts of sheet goods making scrapbooks pop and cards extra-special. If you don't have one, flip over to amazon.com and order one right now!  I'll wait....

Seriously, if you don't have one, follow this link to Miss Ginger's Consumer Product Review.  You need one, so you might as well know what you are shopping for! Once you get it, you will want to know how to use it to make stencils.


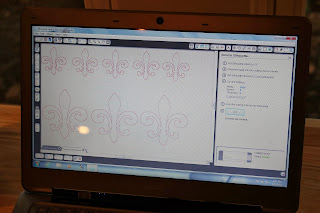
Using the software included with the machine, Miss Ginger selects the design she wants to stencil, and downloads it over the internet. Once she has the file, she can resize it, flip it, rotate it, duplicate it, stretch it, etc.... until she has exactly what she wants.


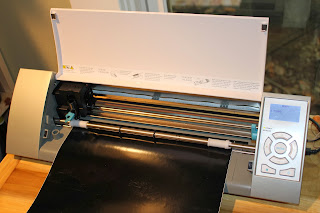
With the design manipulated to her liking, Miss G loads the vinyl into the machine and cuts the stencil.
Once the stencil is cut, she removes the part of the design she doesn't want; a process we call "weeding."  By weeding away the actual design, she leaves a stencil to create a "positive" image on her material.  She could, conversely, weed away the surrounding material, leaving the shape as a "mask" to create a "negative" image on her final work.  If you're confused (I am!) it will make more sense in a minute! 


Once the stencil is weeded, Miss Ginger applies transfer paper on top of the stencil.  Sometimes called "flypaper," the transfer paper comes in a roll like a huge roll of masking tape, and it is designed to stick best to the vinyl material without damaging it. It also sticks veraciously to itself, so be careful! Once the flypaper is in place, use a brayer or the edge of a credit card to smooth out wrinkles and activate the adhesive.


Now you can flip the stencil over and peel the backing paper away from the vinyl, because the transfer paper will keep all of the vinyl in place.  With the adhesive exposed, the stencil can be applied to the object you are decorating.  What can one stencil with this technique?

I'm so glad you asked! 


Here, Miss Ginger stenciled the fleur-de-lis onto a glass bottle to create her wind chime. With the stencil in place, she used a rotary tool with a diamond bit to abrade the design.  Because the stencil is completely waterproof, you can also use it with etching cream to create more delicate designs on glass. 


You can use glass paint to create a stained-glass effect....

  ....or stencil with paint onto wood, metal, or other materials to create signs or other decor.  You can even stencil directly onto walls, mirrors, and windows to give your home a custom look! 


Once your image is complete, just peel away then stencil and your done!  Here are a couple of hints from Miss Ginger to help you along:

1.  Test the adhesive on an inconspicuous piece of your material before applying your stencil.  The adhesive on the vinyl may be too aggressive for some painted surfaces, and my remove the paint when you pull it away.  If your surface fails the adhesive test, try cutting your stencil out of stiff paper, and spray it with repositionable adhesive on the back. This extra step should allow you to apply and remove the stencil without damaging the surface. 
2.  When stenciling with paint, remove the stencil while the paint is still wet.  This will prevent the stencil from lifting the paint film, creating a jagged edge. 
3.  On glass, you may need to use a razor blade to scrape the vinyl away from detailed images.  The vinyl sticks pretty aggressively to glass. If this won't work with your application, use paper and spray adhesive. 

Have fun, and please leave a comment with links to your most creative endeavors! 


Sunday, November 3, 2013

Miss Ginger's Consumer Product Review®: Silhouette Cameo Cutting Machine

Shortly after man discovered fire, he invented the personal computer, which he found rather worthless until he invented a machine to make it print. 
From that point forward, history advanced rapidly as the computer-attached-to-a-typewriter was replaced by dot matrices, lasers, and all sorts of ink-spraying contraptions that we now call "printers".  


Once the typewriter had been obliterated from the desks of happy secretaries everywhere, mankind took aim at the venerable "scissors", and created the "knife plotter" to slice paper, vinyl, and just about anything else that comes on a roll with digital accuracy.  Of course, like all new computer technology, these things were huge and expensive. (Cue cheesy infomercial music:)  
"Until now!" 


The Silhouette Cameo is a small-scale vinyl cutter designed for  hobbyists, scrapbookers, and  crafters. Miss Ginger has been using the Silhouette Cameo cutter for several years now, and finds it to be versatile, well-made, and, most importantly, fun! 

First, a little background on hobby "cutters".  


The first hobby cutters were "punches", not unlike the old one-hole punch we all used a kids to put our homework into binders.  Clever hobby marketers created punches in thousands of shapes, sending many a scrapbooking hausfrau into the poorhouse as she spent the butter and egg money on the latest, newest shapes.  But punches were limited in size and intricacy, so the crafting industry needed to come up with a new idea, since they had run out of simple shapes! 


Next came the "die cutters", which use a sort of high tech "cookie cutter" to punch shapes out of paper and other flat materials.  Die cutters had, and still have, the distinct advantage of being able to emboss paper without cutting it, making textured cards as easy as turning a crank. This machine allowed the craft marketers to rake in millions as they created a seemingly endless array of shapes and textures that led us all to scream "Buy ALL the dies!" At $10- $20 bucks a pop, husbands across the nation where declaring Michael's "off-limits" and canceling internet service to prevent unauthorized ordering. 
Yet still, we wanted more....


Crafting engineers figured out how to make a small-scale electronic cutter for hobby use, but their marketing people screamed "WAIT! Don't screw up our market for shapes!  We need consumables!" and the "cartridge" was born.  In an astounding feat of retro technology, this almost "cutting edge" machine was relegated to the video games of the 1980's by requiring the user to obtain the cutting files on proprietary cartridges that contained the files needed to make this hunk of plastic slice a frog out of green paper.


Then came the Silhouette Cameo, and crafters the world over were freed from the tyranny of craft marketers forever!  The Silhouette, as modern as it is beautiful, allows the user to download design files from the internet, and store them on just about any memory device they see fit.  The machine works with memory cards, USB sticks, or even your computer's hard drive.  Once you've downloaded a file, it's yours forever! 


The file type is proprietary, so the marketers haven't completely lost their minds; you can only use files you download from the "Silhouette Store", a sort of iTunes for shapes.  But there are still huge advantages over cartridges: they download immediately over the internet, you can resize and manipulate them with the Silhouette software, you can store hundreds (maybe thousands?) on one tiny SD card, and most importantly, they are really cheap! You can also create your own designs with the software, which is included with the machine! 


Another huge advantage for Miss Ginger is that this machine, in addition to cutting paper, can cut self-adhesive vinyl, making it useful for lettering and stenciling without having to use adhesive spray or tape.  It can also cut fabric, and can be used as a pen plotter with accessory ink pens. This photo, with cover raised, shows the relatively simple inner workings.  The white plastic rollers are adjustable to different widths of material.  The knife fits into the black cutting head, which you can see to the left of the machine, just above the sheet of vinyl.  When you download a design file, you will use the silhouette software to let the machine know what type of material you are using. Sending the design to the machine is just like send a print job to a printer, and the machine whirs into action, moving the blade side to side, and the material up and down, to cut the lines and curves of your design... so easy! 

What can you make with the Silhouette?  Check out Miss Ginger's craft pages- most of her designs use the machine in some way or another!  In addition to vinyl, paper, and fabric, the machine can cut heat transfer material, so you can iron-on to fabric to create custom garments, pillows, etc.  There is a rhinestone transfer material that Miss Ginger has yet to try, but it allows one to use heat-set rhinestones to create intricate designs. 

The machine is not cheap, but it's not super-expensive, either... it costs about the same as a mid-range sewing machine. The real value, however, comes in the price of the designs... most cost about 99 cents! You download only the ones you need, when you need them, and once you've bought them, you can use them again and again.  The vinyl material is kind of expensive when you buy it in the little rolls they sell at retail, but you can order a commercial-sized roll from US Cutter and use it forever! 

For versatility and usefulness:   5 lipsticks!
For value in the long term: 5 lipsticks!
For quality and durability: 5 lipsticks!

It's unanimous! The Silhouette Cameo earns Miss Ginger's coveted:

5 LIPSTICKS AWARD!

Now, what do YOU want to see Miss Ginger make with it? 

LinkWithin

Related Posts with Thumbnails