The FABULOUS Miss Ginger Grant!

The FABULOUS Miss Ginger Grant!
Click here to dig through my stuff!

Miss Ginger's FABULOUS Things!

NEW!!! Visit my online store for your chance to buy all things Ginger!

Search Miss Ginger's FABULOUS World!

Custom Search

Translate

Sunday, May 26, 2013

Awesome Sauce!


Which would you buy?

This:
Miss Ginger's FABULOUS! Barbecue Sauce

Ingredients: Tomatoes, Onion, Bell Pepper, Brown Sugar, Cider Vinegar, Garlic, Spices, Salt


OR:

This:
Kraft Thick and Spicy Brown Sugar Barbecue Sauce

Ingredients: HIGH FRUCTOSE CORN SYRUP, VINEGAR, WATER, TOMATO PASTE, MOLASSES, BROWN SUGAR, APPLE CIDER VINEGAR, MODIFIED FOOD STARCH, SALT, CONTAINS LESS THAN 2% OF NATURAL HICKORY SMOKE FLAVOR, MUSTARD FLOUR, DRIED GARLIC, SPICE, POTASSIUM SORBATE (TO PRESERVE FRESHNESS), DRIED ONIONS, CARAMEL COLOR, PAPRIKA.


Sorry! You can't buy Miss Ginger's awesome sauce (yet!) But if you, like most people, are trying to avoid High Fructose Corn Syrup, and the shitstorm of chemicals it takes to make "modified food starch", you can make this delicious barbecue sauce at home, and preserve it to last for up to a year on your pantry shelf, without chemical preservatives! The work is satisfying and not hard to do, and you won't need a lot of specialized equipment, although there are a couple of cheap tools that make it easier. It does take the better part of the day, if you start with fresh tomatoes.

Miss Ginger started with about 24 large tomatoes that she bought at the local produce market.  She'd love to tell you that they were farmed by local nuns that use the proceeds to feed the homeless, but they were trucked up from Mexico, just like the ones at the grocery store.  They were cheap and fresh, just like her, and after being at the produce market, needed a good bath- just like her! She rinsed them in a tub of diluted cider vinegar, just to get any dirt or oil off of them.


Next, she cored them with her little plastic tomato corer thingy (you can use a paring knife if you're brave) and got them ready to peel.


Peeling tomatoes is not as tedious as it sounds if you know the hot/cold trick.  Drop the tomatoes into a pot of simmering water for 3-5 minutes, just until the skins start to crack.  Then, dunk them in ice water to stop the cooking and cool them down enough to handle.  The skins will slide right off, and you'll be left with a slimy, naked tomato, ready to give it guts to become part of your handiwork!


This part gets a little messy, so put on an apron!  You want to get the seeds and "goop" separated from the meat of the tomatoes, so you won't have to boil it for 3 days to get it thick enough!  You can slice them and scoop with a spoon, but Miss Ginger found it easier just to tear them apart with her bare hands, creating 2 separate containers of tomatoey carnage!


So here on the left is the tomato "meat", and on the right is the "leavings".  This lady says that the leavings are all you need for barbecue sauce, and that the meat should be canned for later use. She thinks it's a waste to use the good part of the tomatoes for sauce, but waste be damned, let's move forward!  

Actually, I did run the "leavings" through my juice mill, and was surprised to get over a quart of beautiful, fresh tomato juice, and just a tiny container of seedy pulp to add to the compost heap! 
(PS- you can skip ALL of the previous mess and steps if you use canned tomatoes!  Find a brand with no added salt or preservatives and it's pretty much the same.)


In a stainless stockpot, combine the tomatoes with 2 chopped onions and 3 chopped bell peppers. (The pot MUST be stainless to avoid a chemical reaction with the tomatoes. Do NOT use aluminum!)  Set on the stove over medium heat, and in a few minutes the tomatoes will give off a ton of liquid. Keep simmering, with an occasional stir, for about 45 minutes.


When all the vegetables are softened, puree them with an immersion blender, or a regular blender, or a food processor, or a food mill- whatever! Just blend the shit till it looks like:


this!  It took 2 batches in Miss Ginger's huge food processor. Once it's all pureed, return it to the stockpot and bring back to simmer. (Real life hint: If stuff has dried on the bottom of your stockpot while you were pureeing, wash it out so it won't scorch when it goes back on the stove!) Simmer for about an hour; the liquid should reduce by about half.

Now add the additional ingredients: 

1 cup brown sugar
1 1/2 cups cider vinegar (5% acidity)
and seasonings to taste. I used:
1 Tablespoon dry mustard
1 Tablespoon paprika
1 Tablespoon canning salt
1 teaspoon celery seed
1/2 teaspoon cayenne pepper
a few shakes of Lea and Perrins
a buttload of tabasco

A couple of comments on substitutions, based on my research (yes, I DO research all most some the really complex blog posts!) You may substitute granulated sugar, molasses, honey, or Splenda® for the sugar in the same amounts.  You can use white vinegar instead of cider, but do NOT use malt vinegar, it will make your sauce bitter. Use should be able to safely increase the amount of vinegar, but do NOT reduce the amount! You must have at least 1 1/2 cups per 20 or so tomatoes in order to process safely. Canning salt is pure salt that has no anti-caking ingredients in it, which supposedly can caused preserved foods to appear cloudy. You can get it wherever you get your jars.

Cook for 1 1/2 to 2 hours more, stirring frequently as sauce thickens to prevent scorching.  Once it's reach the desired thickness, it's ready to use, freeze, or can.  The recipe makes about 2 1/2 quarts of sauce, which is 5 pint jars.  Frozen sauce is far less convenient than jars, since you have to allow time for thawing. I also find the freezing/thawing process thins the sauce a bit, so I end up having to re-cook it, which is a pain! It's worth taking the time to can it, which is about an hour, start to finish. 

By the way, if you've never canned anything, sauces are a great 1st project!  They contain plenty of acid, which is what keeps the food fresh.  And they have long cooking times, so you don't have to worry about rushing things so they don't overcook or get soft!

You can accomplish the process in any pot large enough to cover the jars with simmering water; it does not have to be stainless, since it won't touch the food. Bring the water to a steady simmer, and sink the jars, lids, ladles, and anything that will touch the food in there to be sanitized. BTW, you must use specific jars and lids made for home canning- save your leftover mayonnaise jars for other crafty projects! 


Here's my little "operatory" all ready to go. I've got my simmering canner, my hot sauce, and my simmered pint jars and lids, along with a sanitized ladle and butter knife.  I also have a couple of paper towels handy, a pair of tongs to handle the hot jars, and a glass of wine. Duh! 


Fill each jar, leaving 1/2 inch of headspace at the top. This allows the liquid to expand and contract without breaking the jars.  Once all the jars are filled, adjust the headspace if needed, and clean the top of the rim with a damp paper towel.  Set a pre-simmered lid on each jar and hand tighten the rings to hold the lid in place. Don't over tighten, just finger tight. Using tongs or a jar lifter, place the covered jars back in the simmering water bath, and let them simmer for 20-35 minutes, depending upon your altitude. Use a canning rack or add enough empty jars to fill the pot so your filled jars remain upright.


Keep the water at a steady simmer; if it boils a bit, just turn it down some, no harm done. If for some reason it stops simmering, turn the heat up, and restart timing from zero once it's reached a simmer.  After simmering for the correct time, carefully remove the jars from the water, and let them rest, undisturbed, on the counter for 14-24 hours, until they are completely cool.  Shortly after they begin cooling, you will probably hear each one "ping" as the pressure reverses and sucks the lid down into place, forming the seal that keeps it fresh on the shelf!  Once they are cool, unscrew the rings and lift each jar by the edge of the lid.  If the lid stays on, you know the jar sealed properly and is shelf-stable.  If the lid comes off, you didn't get a good seal.  You can reprocess that jar with a new lid, or keep it in the refrigerator and use it within a week. 


Add a cute label (don't forget the date, as Miss Ginger did on these!) and store them on a shelf in a dark, cool place like your pantry. Once they are opened, keep any unused portion in the fridge for a week or so. 


Concerned about the safety of home canned products? Knowledge is power, and there are 2 important sources of knowledge to help you put up food safely.  The USDA has a website specifically dedicated to helping you safely preserve food at home, and it includes 7 printable guides that form the "bible" for home food preservation.  This recipe is based on the recipe given in guide #3, which is all about tomatoes.

The other website is maintained by Jarden Home Brands, which probably manufactured the jars and lids you are using, at least in America. freshpreserving.com  has a variety of recipes and techniques using Ball® and Kerr® products.  Both sites include processing times for all altitudes, as well as lots of tips to make canning safe, healthy, and easy! 

Fresh barbecue sauce just in time for the summer holidays!  What should Miss Ginger make with it?!

Kitchen Quicktip®: Bell Peppers

Do you know how to get the best value for your money when buying bell peppers?  Momma G taught Miss Ginger years ago, and now she's gonna teach you!

Her secret? Look for the boys! And how do you tell a boy bell pepper from a girl bell pepper?  Same way you would tell with any animal- turn it over!  The boys have 3 distinct divisions, like the peppers in the top of this photo, while the girls have 4, like the pepper beneath.

Why does it make a difference?  Because the boys have a lot more "meat", the green part on the outside that you actually use, vs. the girls, which have a lot more internal "reproductive organs" on the inside that you end up throwing away!  

See?  The girl on the left has lots of seeds and internal structure to throw away, while the boy on the right yields much more edible pepper.  Pound for pound, you'll get more for your dollar if you buy only boys!

Are they really boys and girls, or was Momma G just pulling my leg? May some botanist out there can set the record straight, but you gotta admit: Momma's story sure makes it easy to remember which peppers to buy! 

Sunday, May 19, 2013

Stained Glass Bottles and Jars

Here's an easy, fun way to keep glass bottles and jars out of the waste cycle that requires no specialized equipment or skills- just an artistic eye and a few bottles of inexpensive paint!  It's so safe and easy even a kid can do it, but adult artists will also enjoy the ability to recreate "old world" techniques with modern, water-based products! 

Gallery Glass paints are one of those "sleeper" products that sort of "undersells" itself on the shelf at the craft store, with a lot of the example creations looking sort of juvenile and "crafty".  Miss Ginger's taste is a bit more "traditional", so she prefers to use the products to reproduce the look of stained glass, but it just underscores the fact that this craft has something for everyone!


What most of us think of as "stained glass" is actually "leaded" glass; thousands of pieces of colored glass, cut into sort of a mosaic, and pieced together with flux and solder. Beautiful, long-lasting, and expensive, real leaded glass is hard to come by these days. The work is tedious, somewhat dangerous (hot soldering irons, sharp glass, and molten metal!) and requires a lot of patience, practice, and trial and error! 


These products give the look of leaded glass with no lead, no heat, and no sharp edges!  The secret to the most traditional-looking results are the Redi-lead® strips  that provide the look of soldered lead from a self-adhesive vinyl product! The flexible "lead" lines peel off the backing paper with their adhesive intact, ready to smooth onto any glass surface. Easily cut to length with an Xacto® knife, the strips provide a consistent width and depth, similar to the lead wire that would have been used in days of old- but without that pesky problem of lead poisoning- not to mention the hassle of soldering!  With a paper pattern under the glass, it's easy to follow along the lines and curves from the outside to create the "seams" between your "pieces of glass"!

Liquid Leading® provides the look of soldered joints, without the hassle of a soldering iron and the danger of lead solder.  With the consistency of thick black paint, it's easy to dab Liquid Leading® onto butt joints to create the sections that you will paint to mimic colored glass. 


Once the leading is in place and the "solder" has dried, it's time to apply the color to the pattern pieces to finish your project. You don't even need a paintbrush! The bottle has a sharp tip that allows you to flow the product right up against the lead lines, and then quickly flow enough paint across the surface to create a solid section.


The color goes on opaque but dries to a translucent finish, with a wavy texture that mimics old-fashioned stained glass. Keep the surface horizontal until the paint has set, to keep it from flowing to the bottom of your shape.  On a round jar or bottle like this, you will have to apply the color in 4 "strips", rotating the bottle after each strip to bring the next area to the top.  Although the color dries to the touch in a few hours, it doesn't "set" for several days, so as you move from one section to the next, you will need to devise a way to "hang" your project so you can work on a section while the previous sections cure.  If you set it down on an uncured section, it will stick, and you will have a mess on your hands! 


A rod or dowel wedged into a drawer provides a stable way to apply color to the top of your project without ruining the bottom.  You will have to let one side dry for a few hours before you can turn it upside down, but that's better than waiting three days for it to cure completely! 

Once all your colors are applied, you're done!  Here's the pickle jar you saw earlier. With it's lid sprayed green, it makes a beautiful storage jar with a "Craftsman" feel to it. Or, leave the lid off and it can be a period-sensitive candle holder! 

Miss Ginger's first project was these Modrian-inspired spaghetti sauce jars. Instead of using leading, she used masking tape to tape off the sections, then sprayed matte black spraypaint over the whole thing.  When she peeled off the tape, she was left with clear windows. In authentic Modrian style, she left many of the sections clear, and colored only few.  Maybe not museum-worthy, but quick, cheap, and easy- just like Miss Ginger! 

The next project was these wine bottles decorated with an oval-cut jewel pattern.  Here, she used black vinyl in her Silhouette® machine to create the pattern, hence the more modern appearance.  The only problem she found with this technique is that there isn't much depth to the sections, so the paint went on kind of thin.  She's going to fill them with blue Listerine® and put one in each bathroom, so it won't matter if the pattern is kind of weak! 
As she prepared to complete the "fully-leaded" project you see at the top of this post, she realized that the colors dry to a very different hue than the way they appear in the bottle, so she made herself a "swatch bottle" to show how each color looks when dry.


The paints cost less than $2.50 a bottle at Michael's; less when you buy a set.  The bottles you paint are free, so what's stopping you?!  Leave a comment and let Miss Ginger know how your project turned out! 


Tuesday, May 7, 2013

Consumer Product Review- Janome 300E Embroidery Machine, pt. II.

After a year of using the Janome 300E Embroidery machine, Miss Ginger is ready to give you her Consumer Product Review® on this miracle machine! She will share what she knows, what she doesn't know, and what she is still trying to figure out- so pour yourself a glass of wine, honey, 'cause she has a lot coming at you!

First, let her say that the Janome machine is not unique- there are many embroidery machines on the market, and at least 2 are simply repackaged versions of the Janome.  While Elna and Bernina both make exquisite sewing machines in Switzerland, they leave the manufacture of their embroidery-only machines to the electronic geniuses in Japan. The Elna 8300 and the Bernette 340 Deco are essentially the same machine as the Janome, and are built in the same factory; the differences are cosmetic and electronic, but the mechanics are all pretty much the same. They all connect the hoop to a post at the back of the machine, which can be seen in the Bernette image below.
Janome
Bernette/Bernina
Elna

The other set of brandmates you will find are manufactured by Brother, and include their nameplate, plus Necchi and BabyLock. They can be recognized by the bar that runs from the front to the back of the machine.
BabyLock
Necchi

The top-of-the-line embroidery/sewing combo machines are typically made in any given brand's factories, but these embroidery-only machines are all manufactured in Japan.  Other than cosmetic differences, the various brands will be programmed to use their brand-specific file type, and may have a proprietary hooping configuration, as well.

So, back to the Janome!  One of the first variables one wants to consider when choosing an embroidery machine is the embroidery size.  The Janome 300E offers a 5.5" by 7.9" embroidery field. While this is not the largest embroidery field available, it is pretty large for a machine at this price.  Please note the "hoop size" and "embroidery size" is not the same.  You can buy a "mega-hoop" for this machine, and many others, but the embroidery capacity of the machine does not change.  "Mega" hoops allow you to combine designs, or pieces of designs, without re-hooping, so a larger design can be created with perfect alignment. 

The Janome comes with 100 designs built in to the machine, a menagerie of floral baskets, teddy bears, and other inane designs.  Built-in designs should really be your last consideration when choosing a machine, because you can download millions of designs from the internet, at a cost of anywhere from free to about 20 bucks. Most designs Miss Ginger has downloaded have cost about $6-7. 

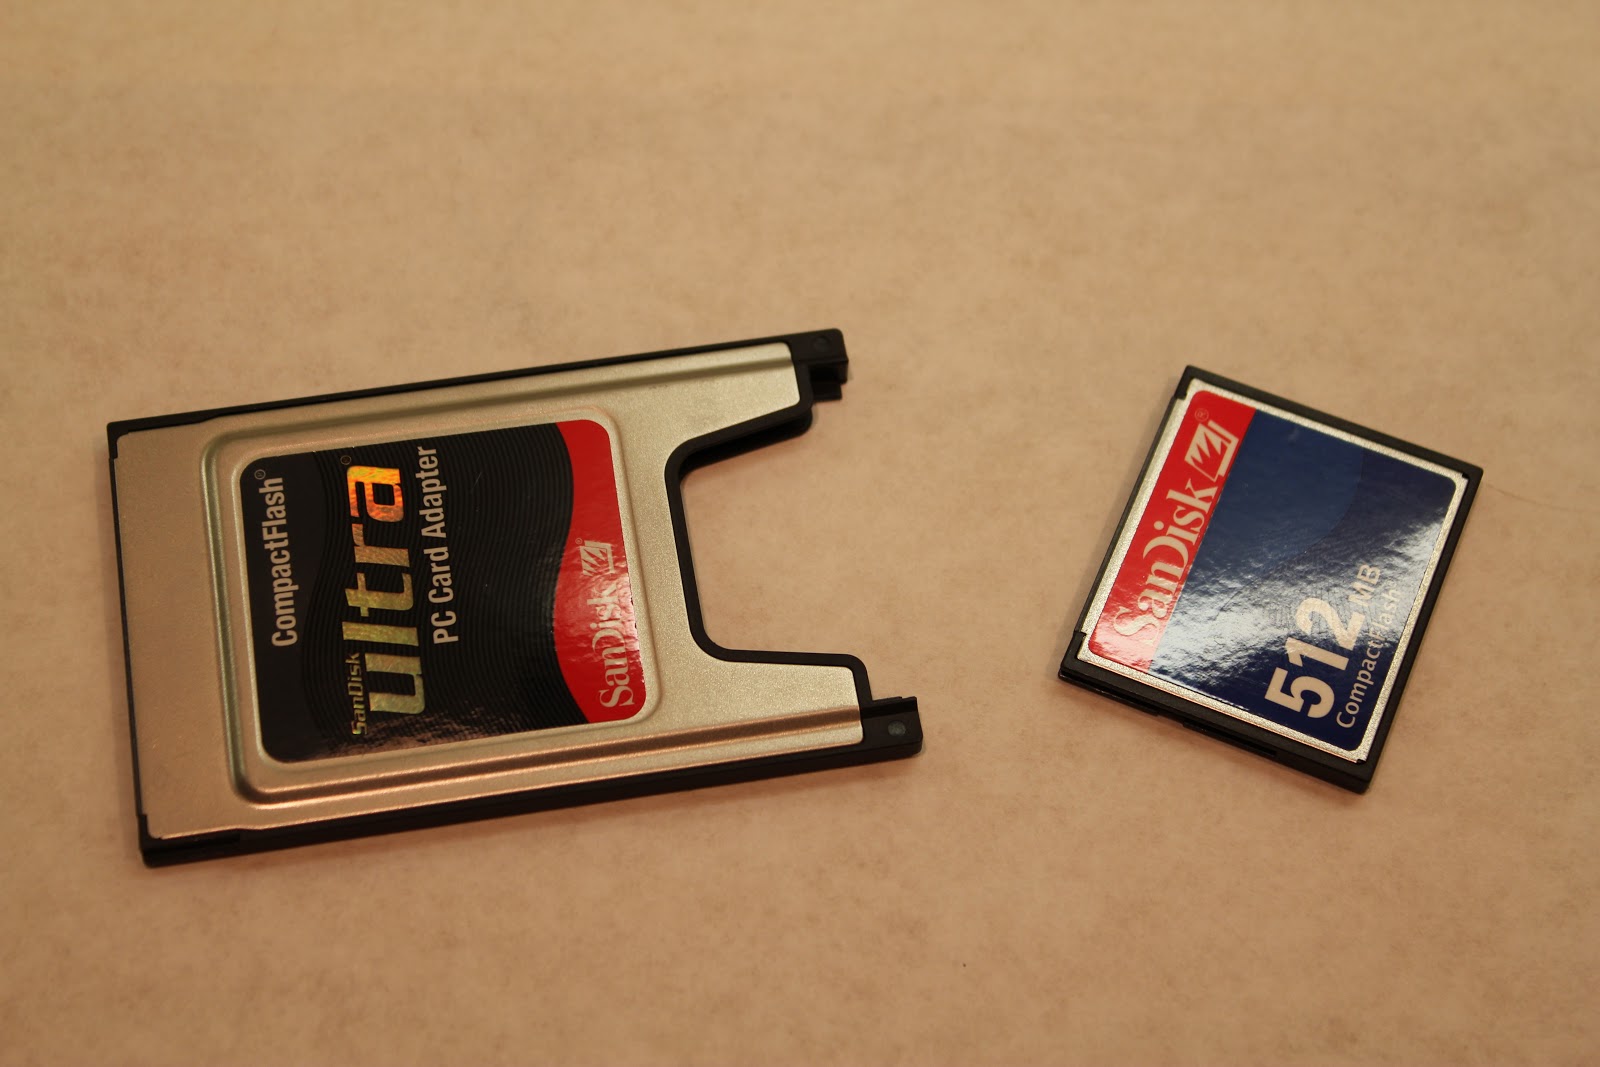
The machine is designed to take PC cards, and Janome offers a number of pre-programmed cards for purchase. 

Since PC cards have pretty much gone the way of the floppy disc, they also offer a PC card adapter, that allows you to use a Compact Flash card to carry  designs downloaded from the internet from your PC to your machine.  Compact Flash memory is cheap, so you can maintain your files on CF memory and load them into the machine when you need them.  The machine also has a built-in memory, so your most often used designed can be stored directly on the machine to be called up whenever you need them.  BTW, PC card adapters are commonplace; you don't need one specific to this machine. PC card adapters are available anywhere office supplies are sold.

This machine has 3 on-board fonts that can be used to create 2 and 3 letter monograms without a computer, but with your PC card and the appropriate software, you can create monograms from any TrueType font installed on your PC.

Embroidery thread for these machines is made by several different companies, and each one has it's own numbering scheme to define the colors.  The Janome machine allows you to select among the most common thread brands, and will prompt you with the brand-specific thread number when it's time to change the thread.


There are a number of convenient features built into the Janome that allow it to do some image manipulation without a computer.  It can flip designs horizontally and vertically, as well as rotate them 360 degrees, in 45 degree increments.  Designs can be resized from 90 percent to 120 percent right on the screen, and you can move designs on the screen to change their relative position within the hoop. 

The hoops come with drop-in templates to help you place your design on the fabric, and once the machine is set up, you can have it trace the design area within the hoop to ensure your design fits within the bounds of your project.

One worthwhile accessory that is only available for the Janome, as best as Miss G can tell, the the Janome Clothsetter.  This simple, yet unique device, allows you to ensure your embroidery design with appear exactly where you want it on the fabric.  


The Janome hoop connects to the Clothsetter the same way it connects to the machine. 


With the bottom of the hoop attached to the Clothsetter, the stabilizer and fabric are set on top, the top of the hoop is laid in place, and the arm of the Clothsetter is lowered.  Align the crosshairs on the Clothsetter with the centerpoint on your fabric, press the top of the hoop into place, and you are guaranteed perfect alignment.  This accessory alone would lead me to choose a Janome machine above all others!


The stitch quality of the Janome machine is exquisite... it creates a beautiful satin stitch, a consistent running stitch, and perfect pattern replication, time after time. 
The control panel shows the time left to stitch out, the color progression, hoop size, and machine condition.  In the rare case of a thread break, or the more common occurrence of bobbin depletion, the machine allows you to back up the design in 10 stitch increments, to restitch an pattern areas that were not completely stitched.


Miss Ginger has completed quite a few projects using the machine, the most recent of which was to create "coordinated" sheets to accompany a duvet she bought on clearance, with no matching sheets available!  


The Janome 300E gets Miss Ginger's coveted 5 lipsticks!!

For the money, this machine is a knockout!!


LinkWithin

Related Posts with Thumbnails