The FABULOUS Miss Ginger Grant!

The FABULOUS Miss Ginger Grant!
Click here to dig through my stuff!

Miss Ginger's FABULOUS Things!

NEW!!! Visit my online store for your chance to buy all things Ginger!

Search Miss Ginger's FABULOUS World!

Custom Search

Translate

Tuesday, December 17, 2013

Happy Holidays from Miss Ginger and the Kitties!

This might just be the cutest Holiday commercial ever recorded! Sorta makes Miss Ginger wish the stuff at Chico's would fit her largesse frame! 

Sunday, December 8, 2013

Craftroom QuickTip®: Glitter and Be Gay!

Who doesn't love glitter?! It adds sparkle and shine to just about anything you can imagine, and come to think of it, a few things you can't imagine. Contained, as it is here in the glass shakers from the restaurant supply store, it's a sight to behold. When it runs amok, however, it can quickly tarnish our moods! 

Why can't someone invent a way to keep glitter in place, so it doesn't flake off of our projects and stick in every crack in our homes?  What if Miss Ginger told you there IS such a product, and you may even have some in your broom closet right now! 


Pledge Floor Care Multi-Surface Finish. Back in the 70's, this stuff was called "Future Acrylic Floor Finish" and came in a futuristic clear bottle. Since then, the folks at Johnson Wax have rolled it into the "Pledge" nameplate, and have changed the package since Miss G last bought it! It no longer says "Future" anywhere on the bottle, nor does it say "acrylic." But it does use the word "finish," which is what you want to look for. If it says "cleaner" it's not the right product! It will come in a clear bottle, and the liquid is crystal clear. Get the one for multi-surfaces, not the one for wood floors.

This stuff will seal glitter onto your project with a death grip, and unlike that hodgepodge stuff that the craft store sells, it won't dull the sparkle of your glitter- if anything, it enhances it. And once you seal it with this stuff, it's not going anywhere! 


After the glue under your glitter has dried completely, just brush it on and let it dry. It's that easy! It goes on so crystal clear that it's hard to tell where you've brushed it, so brush it on methodically so you cover every square inch. It's really runny, like water, so it goes a long way! Just flow it on generously with a brush, and when it dries, that glitter won't go anywhere! 


What about the glitter that got loose before you sealed it down? You've swept, you;ve vacuumed, you've mopped… and still, it has a death grip on your floor! How do you get it up?  This guy:


The same lint roller that you use to get cat hair off your suit will get those last stubborn flakes of glitter up from just about any surface!  

Try these tips next time you need to make something sparkle, and let us know how they work for you!!! 

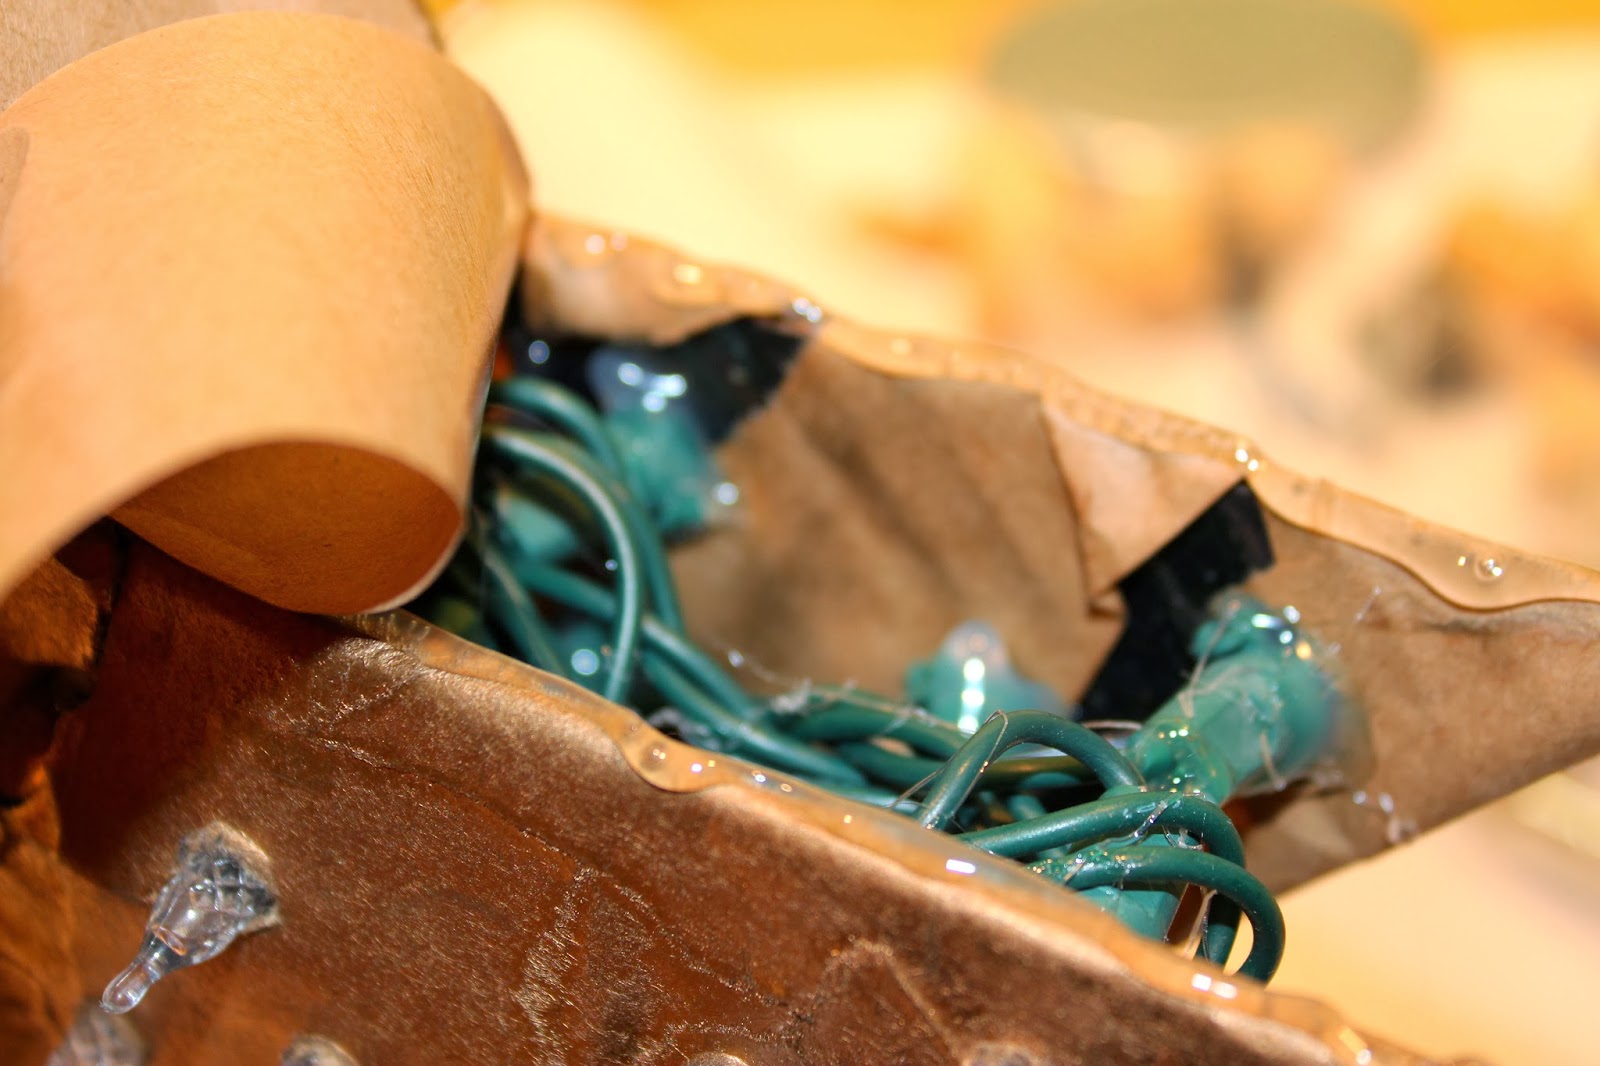
Lighted Star Tree Topper

Whether you deck your halls with a Christmas Tree, a Chanukah Bush, a Kwanzaa Shrub or a Festivus Pole, you're going to need something to finish off the top and make it look festive! Problem is, so many of the tree toppers you see in stores are flimsy plastic things covered in tacky tinsel- certainly not in fitting with Miss Ginger's fabulous themes! So, our girl set out to make her own tree topper, and though it was a bumpy road, she is pretty pleased with the results! 
It started off easily enough, with a vinyl stencil to cut the star shape out of corrugated board. 
She used a stacked star design to give dimension and stability, and held the layers in place with spray adhesive.
Next, she used brown kraft tape and water in a process she calls "taper mache."  For this, you will need old-fashioned brown paper tape with water activated adhesive. It used to be the industry standard in shipping departments, but now it's kind of hard to find, but worth the hunt. You need the kind without any reinforcement fibers or other modern additives to make it stronger… you want the kind that is just brown paper with slick, dry adhesive on one side that becomes slimy-wet in water.
Using small pieces of tape dipped in water, Miss Ginger began covering the skeletons with tape. Because the tape is already in strips, the process is so much easier than regular paper mache, and much less messy since you don't need wallpaper paste!
Another advantage to using tape vs. wallpaper past and newsprint is that the tape will not attract bugs over the years, whereas some wallpaper pastes contain wheat, which bugs like to eat! It just takes a few minutes for Miss Ginger to cover both stars. 
You can let them dry overnight, or put them in a warm oven (about 180 degrees) for about 30 minutes to dry them completely. 

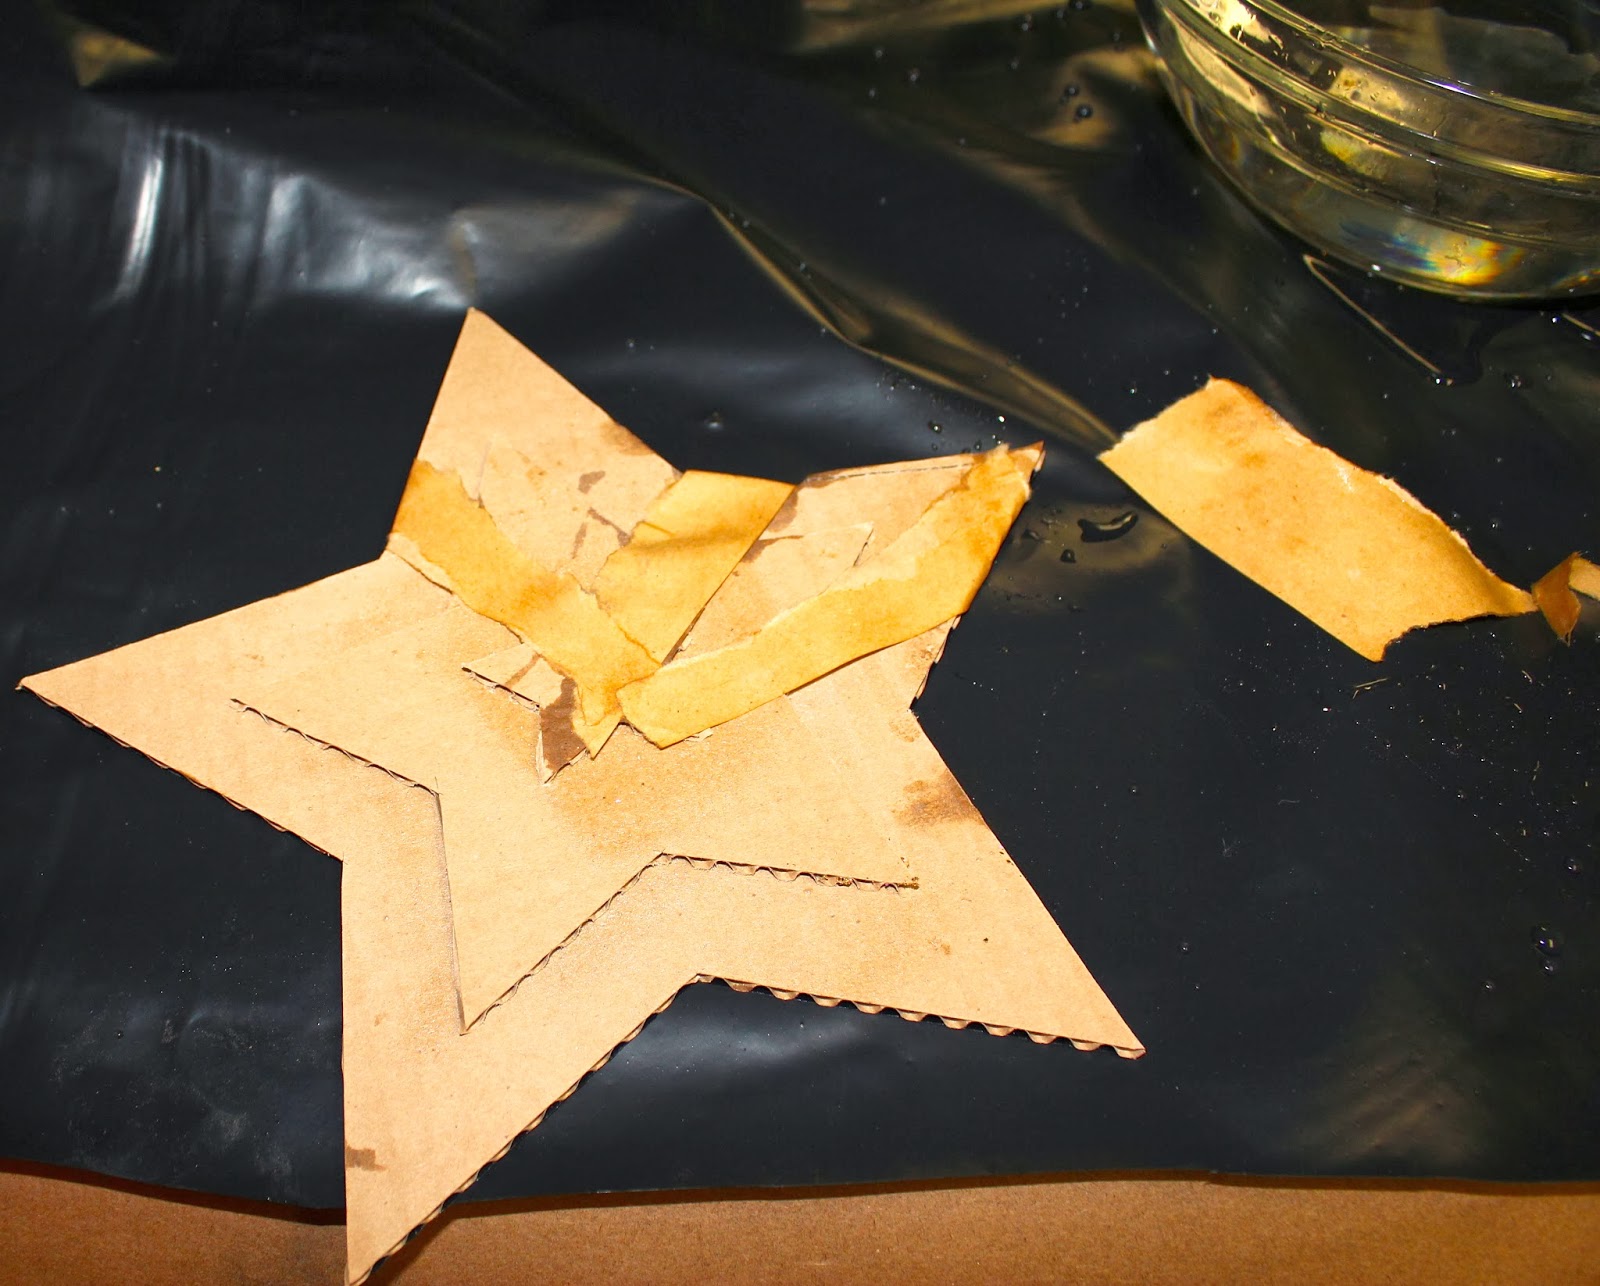
At this point, things are going about as Miss Ginger expected, and she still has great hope for the project! 
After spraying each star with gold paint and letting that dry, she marked, and then drilled, 30 holes in each star, to accommodate the 60 LED light string she bought for the project.  She used LED lights to ensure there would be no problems with the heat of incandescent lights against the paper stars.
Now is when the concerns started popping up! Miss G was thinking that the holes would be snug enough to hold the bulbs in place as she popped them in from the backside, but with the stiffness of the electrical wires working against her, she realized she was going to need something to hold them in place.  Hot glue to the rescue! 
From the front, things were starting to look like a hot mess! She realized she should have measured the spacing of the holes better, and was concerned because the bulbs did not all stay as perpendicular to the surface as she would have liked, but there was no going back at this point! 
The wires turned out to be much more problematic than expected, so Miss G glued them down as much as she could to try and keep them out of her way.  With the wire mess rearing its ugly head, Miss Ginger was beginning to think this whole project was going to be an epic failure! She originally planned to hold the 2 sides together with more paper tape, but she quickly realized that there was no way that paper tape was going to corral all of this mess and hold the 2 sides together! 
As Miss G steeled herself for the challenge with a glass of vino, the answer became apparent!  She needed something lightweight and solid to connect the 2 sides, and wine corks turned out to be the perfect answer! After hunting down 5 that were the same size, she screwed one into each "armpit" of the first star, adding a blob of hot glue between the cork and the star for extra stability. 
With confidence bolstered, Miss G eased the other star into place and connected it to the corks in the same manner. The star was turning out way thicker than she originally visualized, because there was no way to smush the wires down any more than they were.  Miss Ginger found that this turned out to be a happy accident as she soldiered on. 
As luck would have it, the corks were as tall as her tape was wide, so it was easy to seal the sides up using more tape! She needed a more structural adhesive than what was on the tape, so instead of wetting it, she used hot glue to attach it all around the edge. 
At the bottom, she drilled a small hole in the cork crosspiece to hold a stiff wire that will hold the star in place, and routed the cord here, as well. 
So, here is her big, fat, star, looking sad and ugly. But she had gone this far, so Miss Ginger sallied forth and began her favorite process: glittering! 
After glittering the edges in gold, Miss G glittered the front and back with a few different shades of gold, to give a radiating effect.  Because the star rests in the bulbs, she was able to flip it over and do the other side immediately. 
So there it shines in all it's glory, looking festive, shiny, and not too bad, if Miss Ginger does say so herself! 

Sunday, November 24, 2013

Wintertime QuickCraft®: Fire Starters!

It looks like those GingerSnaps lucky enough to have a wood-burning fireplace will get a lot of use from it this year, if the beginning of winter is any indication of its intensity! Miss Ginger's indoor fireplace is push-button gas, which is convenient and cozy, but it doesn't really satisfy her pyromania like a real wood-burner, so she keeps an outdoor chimenea stoked on the patio for the times she can't resist the firebug! 

Whether your fireplace is indoors or out, and whether you are at home or out camping around an open fire, here is a little craft idea that will make starting a fire (on purpose!) a cinch! Just follow her steps carefully, so you don't start a fire before you want one! If you don't have a fireplace, you could still make these as a thoughtful gift for someone who does! It's a total up cycle, so the cost is virtually nil! 

You'll need some coarse sawdust, a paper egg carton (foam won't work) and some wax. Miss Ginger saves the ends and crumbs of candles throughout the year, and adds them to any "strangely scented" candles she may have acquired. If you don't have enough "candle leavings" you can buy a box of wax in the canning section at your grocery store, but that kind of defeats the purpose of an up cycle, no? 


Melt your wax in a double boiler, or an old, clean can floating in a pot of boiling water.  An old metal coffee pot from a garage sale is a great pot for melting wax because it has a handle and spout to facilitate pouring! 


While your wax is melting, begin packing the sawdust into the individual cells of the egg carton.  Miss G tears the top off and use it as a little tray under the bottom to help catch the overflow, but you want to make sure you protect your work surface with several layers of paper to catch spills and soak-through.


Once the wax is melted, carefully pour it over the sawdust, filling each cell with wax.  It will take a lot, because the paper carton will also soak up a lot of wax! 


When the wax is completely cooled and hardened, break apart the cells to create individual starters.  You can make simple gifts by tying them up in a cello bag with some festive ribbon, or fancy ones by nestling them into a bed of sawdust in a small crate or box.


These cute little fire starters  light quickly and reliably with a match or lighter, and because they are coated in wax, they will work rain or shine! 


Monday, November 11, 2013

Gold Leaf Canisters

These beautiful treasure jars feature real metallic leaf, and are the perfect vessel for corralling beauty supplies in the bathroom, or craft supplies in the studio!  They would also be beautiful with a hand-made or store bought candle, or just filled with seasonal materials for festive decor.  They are a great project to practice the art of gold leaf, and can be made from cut bottles with wooden lids, or discarded glass jars with a screw-on lid.  Here are the steps Miss Ginger used to make this classic fleur-de-lis design:


After cutting her bottles, Boy G made the lids on the lathe, and she gathered the rest of her tools and materials.  "Gold" leaf comes in sheets from the craft store, and while it IS metal leaf, it's no longer all gold! You will also need adhesive, undercoat, and sealer- all available online or at the craft store- and and assortment of brushes, depending upon the complexity of your design.


Miss Ginger made stencils to create the fleur-de-lis pattern on the glass. The stencil will control the placement of the adhesive, so the gold leaf will stick to the glass only where the adhesive is applied.


She prepared the lids by painting them with red basecoat, the traditional undercoat for gold leaf.  She used the brownish-red base coat specifically sold for gold leaf, but she has found you can use just about any paint underneath. 


The options for the adhesive are not so generous- you really need to use "Adhesive Size" specifically made for gold leaf. It is thin and clear, dries with the right amount of tack, and stays sticky until covered with leaf.  It does come in a spray form and a pen form... sort of a "glue marker" that would be great if you have pretty penmanship! Miss Ginger has the handwriting of a serial killer, hence the stencils! 
After placing the stencils, she applied the sizing with a small artist's brush, allowed it to dry a bit, and then removed the stencil, leaving an almost invisible film of adhesive on the surface of the glass in the shape of her fleur de lis design.  You can't see it in the photo, but the adhesive is there on the 2 glasses on the left- I promise! Once the base coat was dry on the lids, she covered them with adhesive, as well.
Now comes the fun part!  Gold leaf comes in a little "book" with a clear plastic cover and tissue interleaves to keep each delicate leaf pristine until you are ready to place it.  Static makes it cling to the clear cover, which allows you to handle the leaf without tearing it.  After you've place a leaf, you can tear away the tissue, close the cover, and the next leaf will cling to plastic. Pretty neat, huh?
Miss Ginger laid the gold leaf across the adhesive on the jar and carefully slipped the plastic sheet away, leaving the leaf in place.  You can see the outline of the FDL in the photo; the gold leaf is adhered smoothly in the places where there was adhesive.  The leaf is loose in the voids of the design. 


With an artist's brush, Miss G smoothed the leaf onto the entire image, to make sure it was adhered everywhere. 

Then, with a stiffer brush and a somewhat more aggressive stroke, she began brushing away the excess leaf, in some cases using the brush a sort of a "spatula" to lift large pieces of leaf away that can be reused on the lids.  

There is very little waste with this process, as the pieces that surrounded the image on the glass could be used to cover the lids.  Part of the charm of real gold leaf is that a bit of the undercoating shows between the pieces of leaf, so this is a perfect place to use the "scraps". 


As the leaf is applied to the lids, it is brushed smooth, and the "crumbs" are brushed away and can be saved for even smaller projects!  After all the leaf was placed, Miss Ginger brushed sealer across the lids, and used a smaller brush to cover just the gold design on the glass. The sealer protects the leaf from abrasion, but if the glass ever needs washing it should be done very carefully by hand.


That's it! Wouldn't they be beautiful filled with woodsy fall potpourri?  Leave a comment and tell Miss G what YOU would put in them! 


Thursday, November 7, 2013

Craftroom QuickTip®!

Miss Ginger always keeps a big roll of butcher paper at the end of her craft table... you can buy one that's about a mile and a half long at the club store or restaurant supply, and it will last for years and years!  And it is SO handy! 


Hers is mounted on a little dispenser made from scrap lumber and piece of metal conduit, but you can also buy one at the restaurant supply.  It gives her an endless supply of clean paper to use for everything from sketching out patterns to scratching out shopping lists. 


And here's the best thing... whenever she's working with something messy like glue or paint, she just gives the roll a tug and pulls a sheet out to cover then entire table!  Then, no worries about spills and stains! Ones she's finished, she cuts it at the roll on throws her spatters and spill in the garbage! 

Monday, November 4, 2013

Basic Skills: Stencils

Stencils are what allow Miss Ginger to be an artist.... trust, honey, this bitch can't draw a straight line, much less a shape that looks like anything other than a blob! Those of you as "advanced in age" as Miss G may remember the manila stencils we used to buy at the dime store whenever we had to make posters  for school.  You held them against the poster board, and traced within them with a pencil or crayon, and it made all of your lettering look like it was cargo from overseas! 


While you can now find plastic stencils at many craft stores, you are limited to the designs that are available, and these stencils still have the basic problem that has plagued reusable stencils since the beginning of time:  "floating" negative space has to be connected with a void, causing that "stencilly" look that says "8th grade poster from the 70's!" 

Every modern craft room today has some sort of "die cutter" to make hearts and flowers out of all sorts of sheet goods making scrapbooks pop and cards extra-special. If you don't have one, flip over to amazon.com and order one right now!  I'll wait....

Seriously, if you don't have one, follow this link to Miss Ginger's Consumer Product Review.  You need one, so you might as well know what you are shopping for! Once you get it, you will want to know how to use it to make stencils.


Using the software included with the machine, Miss Ginger selects the design she wants to stencil, and downloads it over the internet. Once she has the file, she can resize it, flip it, rotate it, duplicate it, stretch it, etc.... until she has exactly what she wants.


With the design manipulated to her liking, Miss G loads the vinyl into the machine and cuts the stencil.
Once the stencil is cut, she removes the part of the design she doesn't want; a process we call "weeding."  By weeding away the actual design, she leaves a stencil to create a "positive" image on her material.  She could, conversely, weed away the surrounding material, leaving the shape as a "mask" to create a "negative" image on her final work.  If you're confused (I am!) it will make more sense in a minute! 


Once the stencil is weeded, Miss Ginger applies transfer paper on top of the stencil.  Sometimes called "flypaper," the transfer paper comes in a roll like a huge roll of masking tape, and it is designed to stick best to the vinyl material without damaging it. It also sticks veraciously to itself, so be careful! Once the flypaper is in place, use a brayer or the edge of a credit card to smooth out wrinkles and activate the adhesive.


Now you can flip the stencil over and peel the backing paper away from the vinyl, because the transfer paper will keep all of the vinyl in place.  With the adhesive exposed, the stencil can be applied to the object you are decorating.  What can one stencil with this technique?

I'm so glad you asked! 


Here, Miss Ginger stenciled the fleur-de-lis onto a glass bottle to create her wind chime. With the stencil in place, she used a rotary tool with a diamond bit to abrade the design.  Because the stencil is completely waterproof, you can also use it with etching cream to create more delicate designs on glass. 


You can use glass paint to create a stained-glass effect....

  ....or stencil with paint onto wood, metal, or other materials to create signs or other decor.  You can even stencil directly onto walls, mirrors, and windows to give your home a custom look! 


Once your image is complete, just peel away then stencil and your done!  Here are a couple of hints from Miss Ginger to help you along:

1.  Test the adhesive on an inconspicuous piece of your material before applying your stencil.  The adhesive on the vinyl may be too aggressive for some painted surfaces, and my remove the paint when you pull it away.  If your surface fails the adhesive test, try cutting your stencil out of stiff paper, and spray it with repositionable adhesive on the back. This extra step should allow you to apply and remove the stencil without damaging the surface. 
2.  When stenciling with paint, remove the stencil while the paint is still wet.  This will prevent the stencil from lifting the paint film, creating a jagged edge. 
3.  On glass, you may need to use a razor blade to scrape the vinyl away from detailed images.  The vinyl sticks pretty aggressively to glass. If this won't work with your application, use paper and spray adhesive. 

Have fun, and please leave a comment with links to your most creative endeavors! 


LinkWithin

Related Posts with Thumbnails