
The FABULOUS Miss Ginger Grant!

Click here to dig through my stuff!
Search Miss Ginger's FABULOUS World!

Custom Search
Wednesday, October 31, 2012
Another Organizing QuickTip!
Monday, October 29, 2012
Organization QuickTip!
 Use self-adhesive business card holders from the office supply store to label the jars and containers in your pantry, instead of using an adhesive-backed label. Print your labels on perforated business card blanks. This way if you change the product stored in the container, you can slide out the old card and insert a new one, without having to peel off a stubborn label and deal with the residue it leaves behind!

Miss Ginger has lots more great storage ideas to share, so stay tuned!!
Sunday, October 28, 2012
I've Been "Etching" to Share This With You!
One way to personalize glass and make it special is etching. Miss Ginger knows of 4 different ways to etch glass, each requiring different skills, materials, and equipment, and each providing similar, yet unique, results. This post is going to show the 2 different etching techniques used by Miss Ginger on the "Winchester Room" project, chemical etching and mechanical etching. Both of these techniques provide a true "etch" into the surface of the glass, making it permanent, weatherproof, and dishwasher-safe!
You can also etch glass by sandblasting, but Miss Ginger has not yet perfected that technique (she's working on it!) And finally, there are "frosting" sprays that are available in the spray paint aisle of most home centers, but those will wash off if used outdoors or in the dishwasher.
 On the Winchester Room sconces, Miss Ginger used 2 separate stencils, one for the large "W", and a separate one of the lettering. Stencils can be handcut with an Xacto knife into contact paper, or computer cut with a knife plotter into vinyl. You can also buy premade stencils at craft stores like Michael's and Hobby Lobby. (Miss Ginger has an entire post on stencils coming this week!) Those with an artistic bent can also freehand their designs, but Miss G uses a stencil because she can't draw a straight line, much less a recognizable depiction of anything!
 The "W" stencil was applied to glass, followed by a brushed-on application of Armor Etch cream. Armor Etch will frost the glass wherever it is applied, making it easy to use with vinyl stencils, which protect the rest of the glass from the chemical reaction. It only takes a minute to work, and then Miss Ginger rinsed it off and applied the next stencil. Because she wanted the lettering to be bolder, she etched it with a Dremel Tool, which gives a deeper, rougher etch that stands out better, especially on colored glass.
Here's a different project where you can see how Miss Ginger used the Dremel technique to etch glass bottles to hold dish soap and hand soap near her kitchen sink.
 Diamonds are a girl's best friend when it comes to this project: you'll need a diamond burr bit to fit your Dremel Tool. It sounds pricey but it's not; Miss Ginger bought a 50 piece set from Amazon.com for about 12 bucks, giving her different shapes and points to handle the different nooks and crannies in even the most detailed stencils!
With the stencil applied to the glass, Miss G just followed the outline with the whirling bit, scratching the surface of the glass as she worked. (Those with sensitive sinuses should probably wear a dust mask for this. Miss Ginger doesn't, but she should!) Follow along the edges first, and then fill in the middle. The tool works fast, so it really doesn't take very long to do a simple design like this!

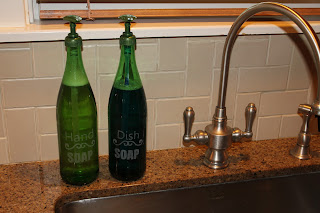 Outfitted with pumps from a couple of old hand lotion bottles, these decorated soldiers avoided the landfill and take their permanent place next to Miss Ginger's sink, ready to wash away dirt and grime at a moment's notice!
What would you want to etch? Have any questions? Leave a comment for Miss Ginger- she'll answer! Promise!
You can also etch glass by sandblasting, but Miss Ginger has not yet perfected that technique (she's working on it!) And finally, there are "frosting" sprays that are available in the spray paint aisle of most home centers, but those will wash off if used outdoors or in the dishwasher.


Here's a different project where you can see how Miss Ginger used the Dremel technique to etch glass bottles to hold dish soap and hand soap near her kitchen sink.

With the stencil applied to the glass, Miss G just followed the outline with the whirling bit, scratching the surface of the glass as she worked. (Those with sensitive sinuses should probably wear a dust mask for this. Miss Ginger doesn't, but she should!) Follow along the edges first, and then fill in the middle. The tool works fast, so it really doesn't take very long to do a simple design like this!


What would you want to etch? Have any questions? Leave a comment for Miss Ginger- she'll answer! Promise!
Saturday, October 27, 2012
Happy Housewarming!
When 2 of GingerNation's most FABULOUS GingerSnaps bought their first home, Miss Ginger knew she wanted to do something special for them. So when Mr. and Miss Alaineous posted photos of their basement redux, Miss Ginger's imagination went to work. They chose a pub theme for their new room, and even named it "The Winchester Room" so Miss G was inspired to give them wall sconce candleholders to frame the grand entrance!
Miss Ginger started by creating a "logo" for the winchester room on the computer, and cut a stencil to transfer it to the glass. After cutting the bottoms off of 2 matching bottles using the G3 cutter, Miss Ginger used etching cream and a Dremel Tool to etch the pattern onto the glass. (She's got posts coming to explain all of the options for decorating glass and making stencils!)
 Once the glass was decorated, Miss G had to create a way for Mr. Mischief to mount them to the wall. From the molding aisle at Lowes she selected 2 inexpensive pre-cut pine pieces, and finished them with a wipe-on stain and glossy spray-on polyurethane. After drilling pilot holes to avoid splitting the wood, she screwed 2 oversized eye-hooks into the wood to hold the neck of the bottle.
 Because these sconces will be holding a heavy bottle and a flaming candle, Miss G. added aluminum rail hangers to the back to ensure they would mount to the wall solidly. If you've not used these before, they are really handy for hanging something heavy, or for hanging something that could be knocked out of position by bumps or vibration. They are easy to find in the hardware aisle at Lowes, and they even have a built-in level to make sure your item is straight and solid!
So here's the finished product, right before Miss G packed them up to send to surprise the Larsens! Miss Ginger can't wait to see a picture of them installed in the Winchester Room!

Cutting Glass...


That stash is 4-deep, folks, so there is a lot of glass craft coming your way!!
Miss Ginger had seen a couple of different methods of cutting glass on Pinterest using yarn and acetone, and they made it look WAY too easy... which is was. The science seemed solid... use yarn soaked in acetone to heat a burning ring around the bottle, then dunk it into ice water to stress the glass and cause it to break. It broke, alright, but here's the problem with that science: the glass breaks in a line at it's weakest point. The bottles used for water and most wines are designed to protect a relatively cheap product, so the glass is extremely cheap, meaning there is a lot of variance in thickness throughout the bottle. If this glass is forced to break along its own volition, the line will be notched, jagged, and not at all straight.
A much more reliable way is to use a glass cutter to score a line along the surface of the glass, thus creating a straight, controlled point of weakness for the glass to break. You still use a hot/cold shock, but you have shown the glass where to break!
There are 2 readily available devices designed to create this line. The first, sold all over in craft stores and on the internet, is a cheap black plastic pos with which Miss Ginger became disgusted from the moment she tried to use it!

The other readily available cutter is the G2 "Generation Green" bottle cutter, which Miss G highly recommends!
This unit is made of sturdy aluminum levers and is easily adjustable to the diameter of the bottle and the height of your cut. Once the dimensions are set, you can cut bottle after bottle at exactly the same place to create a "set" of glasses, candleholders, or other crafty items!

Using the G2 is simple! Assemble the unit according to the package instructions. Hold the pivot point in place with your left hand, and adjust the horizontal and vertical planes to position the cutting head perpendicular to the bottle. Once the unit is tightened into position, keep the base of the bottle flat against your work surface as you push the cutting head into the bottle with your right hand and rotate the bottle with your left. The key to a clean cut it to ensure consistent pressure against the glass as you turn the bottle. Done properly, you should hear a scratching sound as the cutter score the top layer of glass.
 After the bottle is scored, hold it into a pot of simmering water to heat it along the score. (Miss Ginger has discovered that her asparagus pot it the perfect size and shape for this adventure!)
 After heating, plunge the bottle into ice water above the depth of the score. You may feel a "bump" as the glass breaks along your score line. If the bottle doesn't separate at the score line, hold it above an below the line with your hand and twist gently in opposite directions. If it doesn't easily separate at that point, dunk it into the hot water again, and it should separate immediately. If it doesn't separate after the 3rd dunk, it's probably a bad bottle- try again with a new one!
 If your score was successful, the bottle will separate cleanly along the score line, and all you have to do is scuff the razor sharp inside and outside edge with emery cloth to prevent cuts and make your vessel usable as a glass, vase, candleholder, or whatever your imagination desires!

Cutting glass is easy, fun, and useful! As you will see in upcoming posts, there are millions of things you can make from up cycled bottles and jars!
Friday, October 26, 2012
It's Here!!!


So what brings about this newfound focus? It's a long story, but in a nutshell: Miss Ginger's original blog started as an attempt to publicize her charitable endeavors, and create a place where friends in the community could go to find out what was happening in her life. With the advent of facebook and twitter, Miss Ginger found much more efficient ways to hawk her shows. Still, she had made so many friends on this blog and beyond that she kept it going with a disjointed series of stories and dialogues that were sometimes sweet, sometimes stupid, but hopefully, always entertaining.
The entertainment will continue, she promises! But as she looked for a new purpose for her blog, she wanted something unique. Even though her domestic prowess is unmatched, "mommy blogs" are a dime a dozen. "Gay" blogs are all over the place, and she didn't want to put herself in competition with Joe.My.God, Towel-rod, or the inimitable David Dust, the masters of the genre. "Drag queen" blogs are almost a ubiquitous as the mommy ones, with Rupaul and every girl who ever sashayed away trying to make a buck in the blogosphere. Those blogs are "fierce", or I think the girls now say "sick-ning", both things which Miss G decidedly are not. She is tasteful... cultured... and just a skilled at putting an arrangement on the table as she is a meal!
So hun-hun-hunty: let's get it going! The crafts are coming, I promise- we'll have our weekly "kiki" to bang out some glitter and settle our nerves!! What's a kiki, you ask?
For ann coulter....
(She doesn't get capital letters in my blog!)
No one could respond better to her ridiculous tweet than this young man....

No one could respond better to her ridiculous tweet than this young man....
Dear Ann Coulter,
Come on Ms. Coulter, you aren’t dumb and you aren’t shallow. So why are you continually using a word like the R-word as an insult?
I’m a 30 year old man with Down syndrome who has struggled with the public’s perception that an intellectual disability means that I am dumb and shallow. I am not either of those things, but I do process information more slowly than the rest of you. In fact it has taken me all day to figure out how to respond to your use of the R-word last night.
I thought first of asking whether you meant to describe the President as someone who was bullied as a child by people like you, but rose above it to find a way to succeed in life as many of my fellow Special Olympians have.
Then I wondered if you meant to describe him as someone who has to struggle to be thoughtful about everything he says, as everyone else races from one snarkey sound bite to the next.
Finally, I wondered if you meant to degrade him as someone who is likely to receive bad health care, live in low grade housing with very little income and still manages to see life as a wonderful gift.
Because, Ms. Coulter, that is who we are – and much, much more.
After I saw your tweet, I realized you just wanted to belittle the President by linking him to people like me. You assumed that people would understand and accept that being linked to someone like me is an insult and you assumed you could get away with it and still appear on TV.
I have to wonder if you considered other hateful words but recoiled from the backlash.
Well, Ms. Coulter, you, and society, need to learn that being compared to people like me should be considered a badge of honor.
No one overcomes more than we do and still loves life so much.
Come join us someday at Special Olympics. See if you can walk away with your heart unchanged.
A friend you haven’t made yet,
John Franklin Stephens
Global Messenger
Special Olympics Virginia
John Franklin Stephens
Global Messenger
Special Olympics Virginia
All Miss Ginger has to add is: "Well done, John Franklin Stephens!" Miss G could have worked for weeks on a response and it would never have been as well-conceived or well written!
Thursday, October 18, 2012
It's coming....
Miss Ginger has a big blog update and a fresh new look headed your way! She's still here, so hang tight! Next week, she's got a new shiz to share with you!
Tuesday, October 9, 2012

Saturday, October 6, 2012

Subscribe to:
Posts (Atom)