You can also etch glass by sandblasting, but Miss Ginger has not yet perfected that technique (she's working on it!) And finally, there are "frosting" sprays that are available in the spray paint aisle of most home centers, but those will wash off if used outdoors or in the dishwasher.
On the Winchester Room sconces, Miss Ginger used 2 separate stencils, one for the large "W", and a separate one of the lettering. Stencils can be handcut with an Xacto knife into contact paper, or computer cut with a knife plotter into vinyl. You can also buy premade stencils at craft stores like Michael's and Hobby Lobby. (Miss Ginger has an entire post on stencils coming this week!) Those with an artistic bent can also freehand their designs, but Miss G uses a stencil because she can't draw a straight line, much less a recognizable depiction of anything!
The "W" stencil was applied to glass, followed by a brushed-on application of Armor Etch cream. Armor Etch will frost the glass wherever it is applied, making it easy to use with vinyl stencils, which protect the rest of the glass from the chemical reaction. It only takes a minute to work, and then Miss Ginger rinsed it off and applied the next stencil. Because she wanted the lettering to be bolder, she etched it with a Dremel Tool, which gives a deeper, rougher etch that stands out better, especially on colored glass.
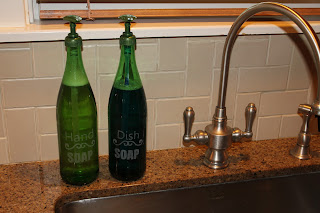
Here's a different project where you can see how Miss Ginger used the Dremel technique to etch glass bottles to hold dish soap and hand soap near her kitchen sink.
Diamonds are a girl's best friend when it comes to this project: you'll need a diamond burr bit to fit your Dremel Tool. It sounds pricey but it's not; Miss Ginger bought a 50 piece set from Amazon.com for about 12 bucks, giving her different shapes and points to handle the different nooks and crannies in even the most detailed stencils!
With the stencil applied to the glass, Miss G just followed the outline with the whirling bit, scratching the surface of the glass as she worked. (Those with sensitive sinuses should probably wear a dust mask for this. Miss Ginger doesn't, but she should!) Follow along the edges first, and then fill in the middle. The tool works fast, so it really doesn't take very long to do a simple design like this!
What would you want to etch? Have any questions? Leave a comment for Miss Ginger- she'll answer! Promise!


1 comment:
Fabulous
Post a Comment