The FABULOUS Miss Ginger Grant!

The FABULOUS Miss Ginger Grant!
Click here to dig through my stuff!

Miss Ginger's FABULOUS Things!

NEW!!! Visit my online store for your chance to buy all things Ginger!

Search Miss Ginger's FABULOUS World!

Custom Search

Translate

Sunday, November 11, 2012

Craft Room!


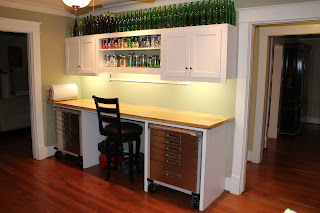
Miss Ginger has been a busy bee putting together the first phase of her craft room, and here it is!!  Now she's REALLY ready to bang out some crafts for you, but first, she's going to let you in on how you can put together a space like this without a lot of carpentry skills or tools! All you need is a wall!

It all starts with these great rolling tool cabinets that form the base.  Miss Ginger got these at Sam's Club, but you may find them cheaper at your local home center, or at Harbor Freight Tools or Northern Tools. You could also use a couple of old dressers or nightstands, matching or not, as long as they are the same height. (A couple of 2-drawer file cabinets would work, also, although the deep drawers are not as useful!)  Since these were on wheels,  Boy G built little "garages" around the 2 cabinets so they can be pulled out to create additional work surface, but if your carpentry skills are limited, you can set your work surface right down on the cabinets.  You can buy a preformed formica counter of varying lengths at Lowes or Home Depot, or you can even use a door, as long as it is flat. Don't worry about the precut doorknob hole- it's a great way to run a power strip to your work surface.


Another option is to buy wooden butcher block counters from Ikea, or if you're really handy, lay-up your  own surface out of lumber, like Boy G did with these poplar boards.  This requires a little more time and a few more tools, but it's allows you to make a low-cost countertop that is durable and beautiful. 


There's an easy shortcut to the overhead cabinets, as well.  If you don't have the time and talent to build  cabinets like these (paneled doors are not easy!), you can buy prefab unfinished cabinets at Lowes.  They are really easy to hang with a cordless screwdriver and a level.  Screw a ledger board onto the wall to make sure they are nice and level, then rest the bottom of the cabinet on the ledge, swing it into place, and screw it into the studs.  The cabinets are not real heavy, but they are a bit awkward, so you may need a helper.

To add the shelves between the cabinets, use nail on strips that hold shelf brackets.  You can buy pre made shelving at Lowes, or buy plain boards in the lumber area and finish them to match.  

Add some plug-in lights underneath the bottom shelf and countertop height stool, and your craft space is ready for your imagination to run wild!  Best of all: even with the shortcuts, you can build the whole thing for less than $800!! 

3 comments:

Ken Riches said...

Outstanding, nice job!

mrs.missalaineus said...

the countertops are beautiful- you do wonderful woodwork!

is that glitter in all those shaker jars?

xxalainaxx

Beth said...

Wow, nicely done! It looks like a bright and cheery place to CREATE!

LinkWithin

Related Posts with Thumbnails