The FABULOUS Miss Ginger Grant!

The FABULOUS Miss Ginger Grant!
Click here to dig through my stuff!

Miss Ginger's FABULOUS Things!

NEW!!! Visit my online store for your chance to buy all things Ginger!

Search Miss Ginger's FABULOUS World!

Custom Search

Translate

Showing posts with label organizing. Show all posts

Thursday, May 30, 2013

Here's Another Organizing QuickTip®!

Do you have one of those "fear for your life" cabinets in your kitchen or utility room?  You know, the one you are scared to open, because you are afraid something will fall on your head and kill you?  

Here's a quick and easy way to get it under control, adhering to Miss G priorities in life: quick, cheap and easy!  And the answer is right in front of your face! Use the back of your cabinet doors!


Your local home center sells wire racks that screw right onto the back of the door, holding your most used items right up front, ready to grab and go.  Here, Miss Ginger has added racks for her bottles of  oils and vinegars she uses most while cooking, easy to grab at the left of her cooktop.  These racks came from Lowe's , cost less than 8 bucks each, and install in minutes with just 2 screws.  They work great on the back of a 12" door, but what if  your door is wider or narrower than that? Or what if you have odd-sized bottles and cans you need to stash?

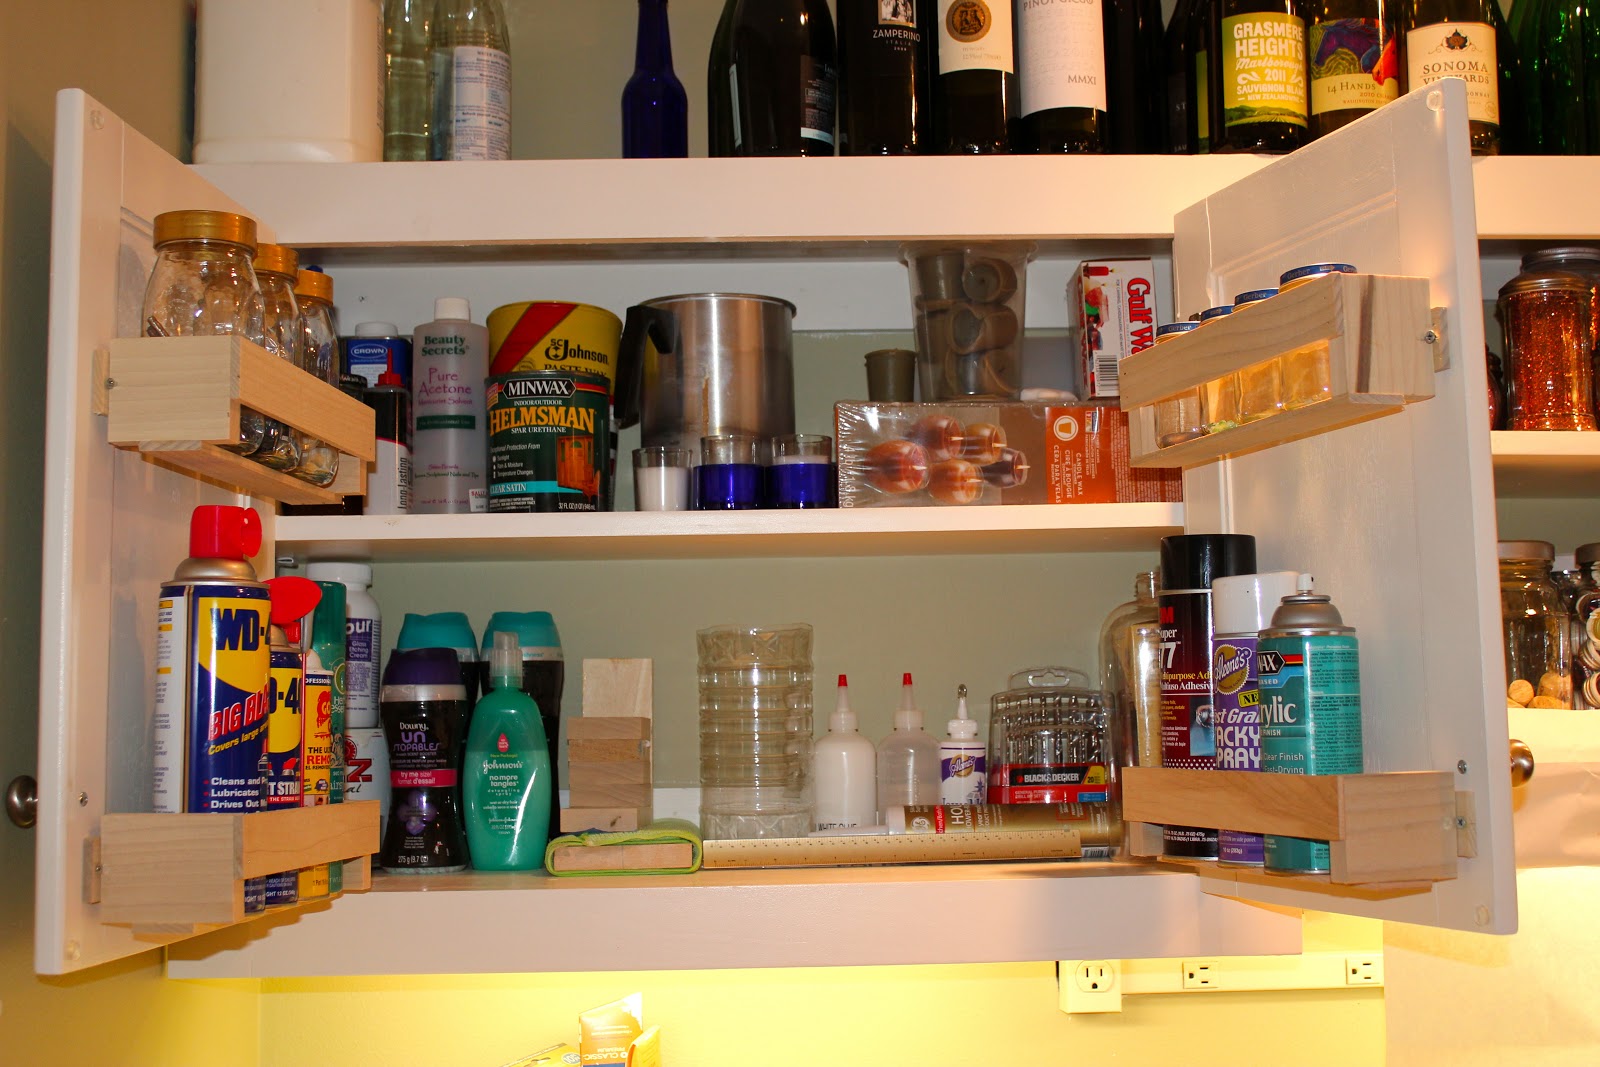
It's easy to make a wooden rack from 5 pieces of wood, and you can create them to fit any door, as well as any size jar or product you need to store!  Here, Miss Ginger wrangled all of her most used spices into racks that are a perfect fit for their little bottles.


It really is easy to do! All you need are 1x3 and 1/4 x 2 craft boards, which come in 2' and 4' lengths at Lowe's, so they are very lightweight and easy to handle.  The only tools you will need are a hammer and a saw, plus a few small finishing nails and a couple of screws for mounting.  A battery operated drill makes installation easier, but isn't essential- a screwdriver will do.


Begin by measuring the back of your cabinet door.  If you have paneled doors like these, with a thin wood panel in the center, be sure to measure from the thick part on the left to the thick part on the right.  This door measures 12 1/2", so that will be the length of the back slat.  Cut this piece from the thin craft board, and cut 2 more pieces 1/2 inch shorter. 


Due to Miss Ginger's poor planning of the photograph, you can't see that the board in the back is actually 1/2" longer than the 2 in front.  To cut the 2 side pieces from the thicker board, measure the diameter of the cans or bottles you are planning to store, and cut the sides to that length.  That's it, you're done cutting!  5 easy pieces! 


To assemble the rack, use small finishing nails or brads to nail one of the shorter pieces to the sides, on the edge that doesn't match your jar measurement.  Nail it flush to the top, as shown here, to form the front of your rack. Miss Ginger usually puts a dab of white glue between the boards before she nails, just to make sure it's nice and solid.


Rotate the rack forward, and nail the other short strip across the bottom, on the side that matches your jar measurement.  Nail it in the center; just eyeball it- no need to be anal!

Finally, rotate one more time, and nail the longer piece across the back, centered.  On each side, drill a small mounting hole through the "overhang".


There it is, ready to mount and round up your junk!  You can paint or stain it to match your cabinets, or just leave it plain. Miss G left these in the craft room plain, to save time, but the ones in the kitchen are stained and sealed because that seemed more kitcheny.


Installing is easy, too- just screw it! Seriously, just 2 screws into the holes you drilled!  Just one little caveat about installation- watch your clearance!


Be sure to install your rack high enough to clear the shelf beneath it, and low enough for the tallest can you will store to clear the shelf above it.  Here, you can see the top rack clears the shelf, and the lower rack is low enough for the can to clear the shelf, as well.


So remember that nasty cabinet at the beginning of the post? Here it is, all cleaned up, with the spray products Miss Ginger uses most within handy reach of her work area, and all the little bits and pieces that were all over the place corralled into storage jars on the top racks! 


At the other end of the workbench, she has her glass paints, in a rack custom-made to the size of the tubes! These would rattle around and fall out of a wire rack because they are so little, but here, they are held snuggly by a rack perfectly matched to their size!

And really, folks, it has taken her longer to write this blog post than it took to make those racks!  Even someone who is awkward with tools could pull this off, so Miss G is sure you can do it!  

Leave a note in the comments and let Miss Ginger know what you are having problems trying to store! Who knows, she may have just the answer for you! 

Thursday, May 2, 2013

Between the Sheets!

Miss Ginger spends a lot of time between the sheets... and she's not ashamed to admit it! Unfortunately, she spends most of that time sleeping, and the rest snuggling with Princess Shelby, so get your minds out of the gutter!!

Momma Ginger was a fanatic about sheets,so Miss Ginger learned a lot about them from her. Momma G once told her "Ginger dear, you probably won't grow up to be much of a looker, so you'd better learn to keep a spotless house if you ever want a man!"  Well, jokes on her-  'cause I'm a knockout, I don't WANT a man, and my house is immaculate! 

Momma G was a white sheet gal- only white sheets, always washed in bleach.  5 boys at different stages of puberty... bleachability was a high priority for her! Miss Ginger, not so much! But she and Shelby appreciate the sanctity of "clean sheet night", and look forward to it every week!

One of the best things Momma G taught Miss Ginger is how to fold a fitted sheet. Can you do it?  Let's see if you are doing it right!  (Sidenote: do you know how hard it is to fold a sheet and take pictures of yourself doing it?!) Anyho, you start with a mess like this, fresh out of the dryer ("Don't let them sit in the dryer", says Momma G. "If you do, you'll never get those wrinkles out!"
Now, here's the fun part:  locate one corner, and hang the sheet over your left fist by that corner, like this:
Now, follow the edge of the sheet down from your fist to the next corner.  Put your right fist on the outside of that corner, and turn it inside-out as you bring your hands together. Once it is inside out, nest it inside the first corner.  Do this 2 more times, and if you do it right, it will look like this:
Now I'm going to lay it out on the dining room table so I can take pictures.  You may be able to do this part without laying it out, but really, it's so much easier to lay it on the bed or a table at this point....
Now, take the edge closest to you, and fold it up, lining up the straight edge on the right side (and concealing the messy left side within the fold!) Now, grab the far side and flip it over, placing the folded edge away from you. This brings this squarest side to the bottom.
Smooth everything out as best you can (no need to be OCD at this point) and fold it toward the middle, in thirds.
Fold the right third over the other two, making a nice, neat package.
Fold it one more time away from you, and you're done!  Nice and neat, ready to stack in your linen closet!
I've got lots more "sheet shit" coming your way, so stay tuned!

Thursday, November 15, 2012

Another Organizing QuickTip!

Did you ever notice how plastic containers are like socks... you can never seem to find the mate?  With so many sizes, shapes and brands of storage containers on the market, Miss Ginger constantly found herself with mismatched tops and bottoms. Quelle domage!

Now, she buys "to go" containers at her local restaurant supply store- the same kind  in which  your egg drop soup is delivered from your local Takee Outee!


They are available in tubes of 25 for about the same price that you'd pay for a 4-pack of brand name containers at your local grocery, and they come in a multitude of sizes that all take the same lid, sold separately!  They nest in a drawer or cabinet and take up very little room! The containers are freezer and microwave safe (don't microwave the lids!), and you can run them through the dishwasher and reuse them.  But, they are so cheap that if you put something yucky like spaghetti sauce in them (does that ever REALLY come out of plastic?) you can toss it without breaking the bank!!


Sunday, November 11, 2012

Craft Room!


Miss Ginger has been a busy bee putting together the first phase of her craft room, and here it is!!  Now she's REALLY ready to bang out some crafts for you, but first, she's going to let you in on how you can put together a space like this without a lot of carpentry skills or tools! All you need is a wall!

It all starts with these great rolling tool cabinets that form the base.  Miss Ginger got these at Sam's Club, but you may find them cheaper at your local home center, or at Harbor Freight Tools or Northern Tools. You could also use a couple of old dressers or nightstands, matching or not, as long as they are the same height. (A couple of 2-drawer file cabinets would work, also, although the deep drawers are not as useful!)  Since these were on wheels,  Boy G built little "garages" around the 2 cabinets so they can be pulled out to create additional work surface, but if your carpentry skills are limited, you can set your work surface right down on the cabinets.  You can buy a preformed formica counter of varying lengths at Lowes or Home Depot, or you can even use a door, as long as it is flat. Don't worry about the precut doorknob hole- it's a great way to run a power strip to your work surface.


Another option is to buy wooden butcher block counters from Ikea, or if you're really handy, lay-up your  own surface out of lumber, like Boy G did with these poplar boards.  This requires a little more time and a few more tools, but it's allows you to make a low-cost countertop that is durable and beautiful. 


There's an easy shortcut to the overhead cabinets, as well.  If you don't have the time and talent to build  cabinets like these (paneled doors are not easy!), you can buy prefab unfinished cabinets at Lowes.  They are really easy to hang with a cordless screwdriver and a level.  Screw a ledger board onto the wall to make sure they are nice and level, then rest the bottom of the cabinet on the ledge, swing it into place, and screw it into the studs.  The cabinets are not real heavy, but they are a bit awkward, so you may need a helper.

To add the shelves between the cabinets, use nail on strips that hold shelf brackets.  You can buy pre made shelving at Lowes, or buy plain boards in the lumber area and finish them to match.  

Add some plug-in lights underneath the bottom shelf and countertop height stool, and your craft space is ready for your imagination to run wild!  Best of all: even with the shortcuts, you can build the whole thing for less than $800!! 

LinkWithin

Related Posts with Thumbnails